How to Start a Mom Blog
Thinking about starting a blog?
Great!
Making the decision to start a blog is one thing, but actually DOING it is a whole another story!
When you start going into the steps to start making one it really sinks in like, “Wow, I’m really doing this!”.
Which can be scary and exciting at the same time!
But I’m sure the reason you’re here is cause you want to start your own blog, but you’re completely clueless about how and where to start.
Am I right?
No worries! I was (and I’m sure just about all of us) were there too!
That’s why I created this post on how to start a mom blog!
So moms like you could easily create one without all the extra stress!
Are you ready?
Below you’ll find easy to follow steps so you can start your own blog today!
(This page may contain affiliate links which means I may earn a small commission at no extra cost to you. You can read my full disclaimer policy here.)
How to Start a Mom Blog
1. Figuring Out What Your Blog Should Be About
First things first.
You have to figure out what your blog is even gonna be about.
This is gonna be your niche.
Now, what is a niche exactly?
A niche is like the subject or topic.
Your niche or “subject” is what you’ll be writing about. It’s what your BLOG is gonna be about!
You could have a blog that’s in the fitness niche, a craft niche, a food niche, a mom niche, the travel niche.
I could go on and on as there are many different types of things you can write about.
So now for the real question.
How Do You Figure Out YOUR Niche? And How Do You Know it’s the RIGHT Niche?
Well, what are you passionate about?
I love being a Mom, pregnancy, and babies! SO that’s what I decided to write about!
But unfortunately, you can’t just be passionate about it. You need to choose something that you actually know about too.
So even though you love blah blah blah, if you feel like you really don’t know that much about it. Better to just not do it.
Why do I say this?
Cause how are you gonna write enough content for it? And how are you gonna answer questions that people may ask you on your blog?
You’ll just be making things harder for yourself and making roadblocks where they don’t need to be.
And lastly, another thing to think about is, can you make money writing about this?
If your goal is to MAKE money with your blog then this is something to really think about.
What Type of Blogs Make the Most Money?
One of the best ways to make money blogging is by writing about stuff that provides ANSWERS and KNOWLEDGE.
So if you’re thinking about writing about your personal life and all the fun weekly things you do with the kids, it’s probably not gonna make any money.
Cause, unfortunately, people don’t wanna read about some random person’s day at the beach (even if it was a super spectacular day).
This is how blogging USE to be. But it’s not like that anymore.
If you want to make money doing this you need content that is gonna help people in some way.
So yes, write about what you love but be sure that what you’re writing about is helping people by giving answers and knowledge.
One thing you could do is try thinking of the types of blogs that make money that you already know do.
Think of big-name blogs that you like and have heard of.
What are they writing about? Do they seem successful? Is this something you could see yourself writing about?
Yes?
Then maybe this could be your niche!
Here are a couple of niches that are typically, profitable and gain traffic. Of course, there are more niches, but maybe these will help ya get the ball rolling!
- Parenting
- Crafts & DIY
- Health & Fitness
- Cooking
- Babies
- Home Decor
- Frugal Living
Once you’ve figured out what your niche is gonna be, it’s time to…
2. Choose the Name of Your Blog
Thinking of what to name your blog is MUCH easier if you figure out what your niche is FIRST (so if you haven’t done that yet, please go back and do that).
You want the name of your website to be able to somewhat represent what your blog is gonna be about.
With my blog name, Mama Kenna, you can kinda already guess what it could be about cause of the word “Mama” in it. That word automatically makes you think of motherhood and being a mom.
Which is great since I’m in the mom niche!
So if you decide you want to start a cooking blog, the name Pretty Sunsets, may not be the best choice.
It’s okay if it takes some time to figure it out. But you also don’t want to take forever trying to think of the perfect name.
It can be very easy to do. But at some point, you just gotta do it!
It took me a couple of days until I decided to just go with what I had!
Here’s an article on How to Come up With a Blog Name.
How Do I Know if The Name I Want is Already Taken?
There are a couple of quick and easy ways to do this.
Search the name you want and see if anything comes up.
If a website comes up with that name, you’ll have to choose a different name.
Usernames from social media sites will come up in the search results as well.
So if a user on social media has that same name, you may want to consider a different name.
I say this because once you have a blog you’re gonna want to have a social presence, and if that name is already taken well then you’re just gonna be out of luck.
The username MamaKenna was taken on a social media channel I was signing up for, but luckily I was able to do MamaKennaBlog instead.
Which I would say works too! And it was available on all social media channels I was planning on signing up for!
Another thing you should check is if the name you’re considering has a trademark.
You DO NOT want to use a name (or anything for that matter) that has a trademark!
You could get in legal trouble for this.
But this can be easily avoided if you just look it up first.
You can look up trademarks here as well as register for your own trademark.
You’ll want to start looking into trademarking your name once you’ve decided to make your blog into an official business. Or you can do it right away if you’d like.
Cause as time goes on it could possibly get trademarked by someone else before you get the chance too. Yes, this does actually happen and I’ve heard these kinds of stories a number of times.
So that’s just something to think about as well.
But anyway, here are a couple more tips for when you’re trying to figure out what to name your blog.
- Make it different and make it unique! You don’t want to do anything that’s too similar to another site. Especially a popular website.
- Try not to be set in stone with just ONE name. Write down a couple of potential names that you like just in case it’s already taken.
- You wanna be sure to look up the names you’ve come up with and see if someone else is already using it. Please please do this! You don’t want to go and register your domain name and it turns out you can’t use it (which could happen anyway, but this way your chances will be much lower).
Once you’ve gotten your blog name figured out, next it’s time to actually begin starting your website!
3. Setting up Hosting for Your Website
Are you ready?
Now comes the part where you actually get to START your blog!
*secretly freaking out* Aaahhhhh!!
Now we’ll need to set up hosting for your website first.
No worries though!
This may be one of the most nerve-wracking parts but it’s also, surprisingly, one of the easiest parts of starting a website!
But I’m sure you’re wondering…
What is Hosting?
Well, if you look it up Wikipedia defines it as “A web hosting service is a type of Internet hosting service that allows individuals and organizations to make their website accessible via the World Wide Web. Web hosts are companies that provide space on a server owned or leased for use by clients, as well as providing Internet connectivity, typically in a data center.”.
So try thinking of the internet as a town. And in that town, there are different apartment buildings you can live in. Now think of hosting as an apartment building. So in order for your website to “live” in town, aka the internet, your blog has to rent an apartment there.
Does that make a little more sense?
Basically you need hosting in order to be ON and FOUND the internet.
So before you ask, yes you do need it.
Today I’ll be showing you how to set up with SiteGround’s Hosting Service.
Why SiteGround?
SiteGround is a very popular hosting service that has been used by many bloggers.
I started my website with them and still currently use them.
So far I’ve had no problems with them and their customer service has always been very helpful to me!
SiteGround is normally more recommended by bloggers because of their excellent performance with uptime and speed.
Both of which are very important.
SiteGround is actually recommended by WordPress.org (which is a very popular and well-renowned website platform)!
SiteGround is a great choice for when you’re just starting out blogging too because they give a special discount during your first year with them!
Choosing a Hosting Plan
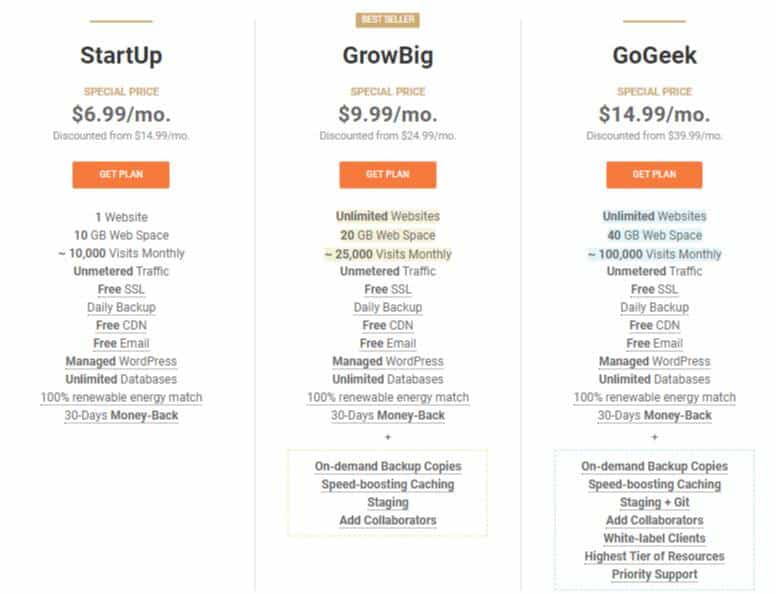
SiteGround has 3 different plans but since you’re just starting out, we’ll just look at the first 2.
- The StartUp Plan- This is the cheapest plan. It allows up to 10,000 visitors a month and gives 10GB of webspace. What’s really nice about this plan is that it has automated daily backups so if anything were to happen to your site, everything from the last 30 days will be restored for free! It also comes with free CDN which helps with site speed. Since you’re just starting out you’d probably be just fine with The StartUp Plan for now (which will help save you a couple of bucks). Your site speed will only be affected once you start getting lots more visits. But luckily you can upgrade to a different plan whenever you want! And if you do it during your first year with them, you’ll still get their discounted price! The StartUp Plan is normally $14.99 a month, but you can get it through this special link for just $6.99 a month!
- The GrowBig Plan- This one is more for when your website starts to grow more and has more traffic. But of course, you can get this plan now if you prefer! With this plan, you can have up to 25,000 visits a month and 20GB of webspace. One of the benefits of having this plan is that you can have as many websites as you want! You get everything that the StartUp Plan comes with plus all 3 levels of SiteGround’s SuperCacher to help with loading speed AND on-demand backups. You can get The GrowBig Plan with their special price of $9.99 a month here! Which is normally $24.99 a month.
Decided on a plan?
Great!
Now for the next step.
4. Registering Your Domain Name
Remember that list of potential blog names I told you to write out?
Well, time to go get it cause it’s time to register for your domain name!
Now, what’s a domain name you may ask?
Your domain name is the name of your blog and will be used in the URL.
Like how my blog’s name or domain name is mamakenna and my URL is https//:www.mamakenna.com.
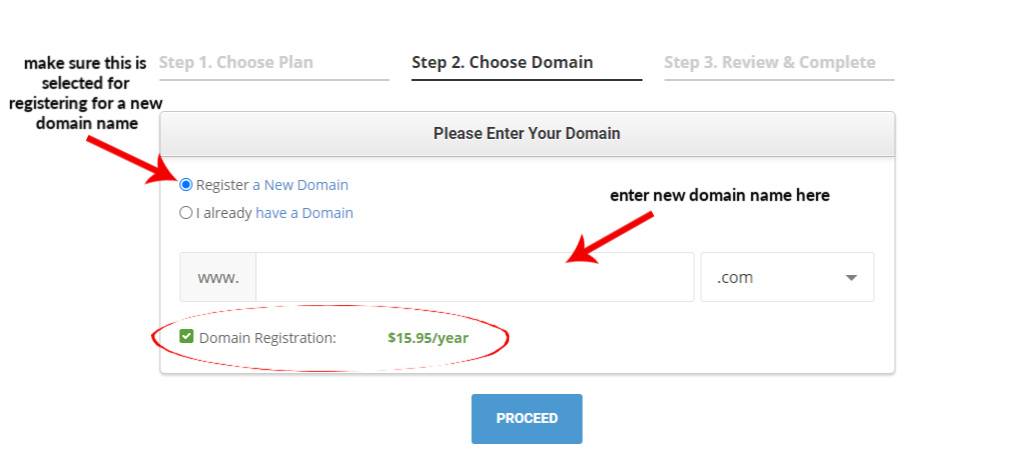
If one of your blog names is already taken it’ll let you know and ask you to type in a new one.
Here are a couple of things to remember when registering your domain name.
- If you’re registering a NEW domain name (which I assume you are anyway) make sure that the Register a New Domain is clicked.
- As you can see, you can choose from a number of different endings for your URL. Such as .net, .gov, .com, .org and etc. I would recommend going with .com as it is a top-level domain (TLD) and is trusted by Google.
Also, in case you didn’t see it, your domain registration does cost $15.95 for the whole year.
5. Review & Complete
After you’ve completed the domain registration, it’ll bring you to a new page called Review & Complete.
Go ahead and enter all of the needed information.
Toward the bottom, you’ll see Extra Services. This will include, Domain Privacy, your Domain Registration (which you just did), and an SG Site Scanner.
The SG Site Scanner is a monitoring service that checks your website daily and will immediately notify you if your website has been hacked or injected with malicious code.
The Domain Privacy keeps everything, well private, since registering a domain name can make your personal information public.
These do come at a cost though.
If you’re trying to keep the price at the lower end, I would recommend that you at least get the Domain Privacy. That way your personal information doesn’t become public.
Because you definitely don’t want that type of information out there.
Once you’ve completed all of the sections, be sure to go back and review everything to make sure it’s correct and looks okay before continuing on.
6. Install WordPress.org
WordPress is one of many blogging platforms and is highly recommended.
WordPress.org is actually one of the most popular self-hosted blog platforms there is!
And SiteGround makes installing WordPress super easy!
They offer a simple click-and-install option so you can start blogging even sooner!
And if you’re still having trouble, you can get help from their 24/7 customer service here.
Login to WordPress

Once you got WordPress downloaded and installed, you can now go and log into your WordPress account!
This is where the magic happens!
This is where you’ll be doing literally EVERYTHING for your site like writing posts and designing your website.
You can get to the WordPress login screen by typing in, https://yourdomainname.com/wp-login.php (be sure to bookmark the login screen for easy access).
7. Getting Started
Now you should be logged in and you’re in your WordPress dashboard.
Wooohoooo!
But I’m sure you’re probably thinking, “Where do I start? What’s this? What’s that? What does this button do? Where’s my website? Ahhhhh!”
It can be overwhelming at first and probably just looks like Chinese now, right?
But don’t worry!
You’ll start to feel comfortable around here soon enough!
But before that, I’ll help you get ahead start on things!
Choosing a Theme
First, let’s choose a theme for your blog.
The theme dictates the design and functionality of your website.
There are MANY different themes to choose from.
Ones that are free and of course, ones that you have to pay for.
Eventually, you will want to get a paid theme as they are better, but for now, you’ll be just fine with a free one!
Here are some of the better free WordPress themes that you can get.
- Astra- Astra is a very popular theme that you can get for free. People love this theme because it’s lightweight, meaning it’s better for site speed. And it’s customizable! You can also upgrade to their paid version later if you end up really liking this theme. You can download the Astra theme here.
- Sydney- This theme has lots of different elements making it so you can customize it to fit your style and brand. You can get the Sydney theme for WordPress here.
- Neve- The Neve theme is lightweight and loads very fast! Which by the way is great! It’s also customizable and comes with pre-made layouts you can use for your website! You can check out the Neve theme here.
Install Plugins
Plugins are like apps but for your website. They can add certain abilities and elements to your websites such as social buttons, spam protection, site speed, and more.
BUT you don’t want to overdo it with plugins!
What I mean by that is, don’t be downloading all these super cool free plugins. Because for 1, they may not be that good and can conflict with each other, and 2 having too many plugins can really slow down your site speed.
This can lead to bad user experience and you don’t want that.
But some are helpful and actually really useful!
So here a couple you should download and install now:
- Yoast SEO- The Yoast plugin is almost a must-have! With this SEO plugin, you can write meta descriptions for search results, optimize posts for social media, make sitemaps, and more! And it’s free! You can get the Yoast SEO plugin here.
- Akismet- Akismet is a spam protection plugin. It will help filter out any spam comments that may get posted on your site. That way you can just delete them and move on! The download is free for this plugin but you may have to pay a very small monthly fee. But it’s super cheap. If anything the most you may have to pay is $5 a month! You can download Akismet here.
- UpdraftPlus Backups- Sometimes websites crash… But with UpdraftPlus you can manually backup or set automated backups for your website! So if anything were to happen, you could easily restore it from one of your saved backups. This plugin is free but they also have a paid version as well. You can get UpdraftPlus and download it here.
Change Your Permalinks Settings
Permalinks are what will decide how your URL will appear. And depending on what your permalinks are set to, could be good or bad…
You want to fix this right away before you write ANY posts!
Permalinks are PERMANENT and changing them later will result in a major headache and could end very very badly!
So it’s best to just change them now and be done with it.
To do this, hover over the word, Settings, in the left-hand column.
Along with a number of other things you can click on, Permalinks will be there as well.
Click on Permalinks.
It will take you to the Permalink Settings.
Once you’re there click on Post Name, then click Save Changes.
And you’re done!
Now never ever ever mess with them again!
Add Some Categories
When you start writing posts, you’ll have to put them into a “category”.
These categories will appear on the home screen of your blog as well.
To do this hover over the word Posts, located in the left-hand column then click on Categories.
First, changed the name of your default category into Archives.
After that go ahead and add a couple of different categories that go along with your niche and what you’re gonna be writing about.
Add Some Pages
You’ll want to add some pages like a Contact Me page, an About Me page, and a Disclaimer page (which is a pretty important one).
You can do this by hovering over Pages and clicking Add New.
Go ahead and create a Contact and About me page.
Then just write them accordingly.
Not sure where to start? Here is a great article with tips on how to write a good about me page!
Now with the disclaimer, you definitely don’t want to wait on that!
Every website needs it and if you don’t have one it could lead to legal trouble!
Yikes!
There are 3 ways you could go about doing this.
One, you can try writing one by yourself.
This would obviously be free but is also gonna be very time-consuming.
Two, you can buy a legal template.
Or three, you can meet with a lawyer and have one written up specifically for your blog.
Now, if you go on the route of writing your own disclaimer policy, at some point I would definitely recommend getting a professional one.
Legal templates are much less expensive than it would be if you got one written by a lawyer.
If you’re interested in purchasing a legal template, you can check out this Legal Bundle here. It has everything you’ll need for your blog including a Terms and Conditions, Disclaimer Policy, and Privacy Policy template.
It’s super easy to use and is actually the same one that I currently use for my blog!
Not in the budget right now?
Here are a couple of helpful posts on how to write your own disclaimer policy.
How to Write a Blog Disclaimer– By Angela Giles
How to Write a Disclaimer Policy for Your Blog– By Nienke Krook
Create a Blog E-mail
Creating an e-mail for your blog is very important.
You can use this for signing up for various accounts that you’ll use for blogging and you can put it on your Contact page as well.
Having an e-mail with your domain name at the end (like how my blogging e-mail is, [email protected]) is recommended as it looks more professional and may help you get approved easier for certain programs.
Luckily with SiteGround, you can create a new e-mail address with your domain name in it for free!
You can do this by logging into SiteGround.
Then click on Websites.
Under Website Details, you should see your website.
You want to click on cPanel.
This will take you to a new page. Scroll down to the Mail section.
Then select Email Accounts.
From there you can create and manage emails associated with your domain name.
I would create one with either your name at the beginning or with admin.
Example- [email protected] or [email protected]
Sign-up for Social Media Sites
Having a social media presence is very important! Especially in this day and age.
Being a part of social media channels can help you gain traffic to your blog. They can also help you create and engage with your audience.
Now, in the beginning, you’re probably not gonna be using any of these, but it’s a good idea to start creating them now!
That way your username (your blog name) doesn’t get taken by someone else.
So go ahead and sign up for the ones that you are most familiar with right now.
And be sure that you use the same username for ALL of your social media accounts!
Start Writing Your First Post
Now it’s time to start writing your first post!
I know, OMG!
You can start writing a new post by hovering over Posts and selecting Add New.
This will take you to a new page where you’ll be able to start writing!
Which is what blogging is right?!
So have fun writing your first post!
I know it’ll be scary and you’ll probably want to edit over and over and over, but eventually, you just gotta hit Publish!
Trust me you don’t want to be stuck on writing one post for months.
And I’m sure your post isn’t as bad as you think!
As of right now, I would say your only focus should be on writing posts and learning about blogging.
You’ll want to have a good amount of content before you start using social media to promote your blog.
I mean you don’t want people coming to it and there’s only 1 post! That may throw them off a bit if they start clicking around your site.
I would say to probably have 15-25 blog posts done before you start using any social media channels as it will be easier to be active on it when you have more content to share.
And while you’re doing that you can read and learn more about blogging by reading ebooks and taking courses (which you’ll find some awesome beginner ones listed below).
Blogging Tools and Resources
When you’re new to blogging you’re gonna want to gain some “blogging knowledge” as well as know about helpful blogging tools you can use.
Blogging groups are a great place to start! They have tons of helpful information and you can ask your own questions there as well.
Below you’ll find lots of resources to help you get started with your blogging adventure!
Courses
- Blogcabulary Plus- This is actually THE very first book I bought when I started blogging! This book goes over lots of things that I think are super helpful for any new blogger. She goes over all the basics to help you understand basic blogging terminology as well as some helpful resources. AND it’s super affordable! You can learn more about Blogcabulary Plus here.
- Blog by Number- I’ve never personally taken this course, but many many people rave about it! She has taught over +55,000 Moms on how to successfully start their own blog. There is a lot of information that is covered in this course. You can see what all the Blog by Number course has to offer here.
- Easy on Page SEO- Right now, you probably have no idea what SEO is. And it’s okay, I didn’t either when I first started. But I really really wish I did! Unlike other SEO courses, this one isn’t super expensive and is at a great price. You’ll learn things you can implement right away to help improve your blog posts to rank on Google. I read this ebook and LOVED it! You can read more about the Easy on Page SEO ebook here.
- Pinteresting Strategies- Do you use Pinterest? Well whether you do or don’t, many bloggers, including myself, have been successful using it to promote posts from our blogs. Pinterest is a visual search engine pretty much and can help bring traffic to your blog. If you put the time into it anyway! I love this course, and many others have been very successful using the strategies used in this course. I think this is a great course for newbie and intermediate bloggers who are ready to start getting into using Pinterest successfully! You can find out more about Pinteresting Strategies here.
Stock Photos
- Deposit Photos- Deposit Photos is a paid stock photo site where you can find pictures to use for your blog. Using paid stock photos is recommended as free stock photo sites could contain stolen pictures that were not put on by the owner/photographer. If you end up using one of these you could end up in some legal trouble. Luckily Deposit Photos has deals that go on all the time that are much more affordable than the regular monthly plans. You can check out Deposit Photos here.
- Pixabay- This is a popular free stock photo site that you can use if money is tight right now. You can check out Pixabay here.
- Pexels- This free stock photo site has lots of different photos you can use for your blog posts. You can go to Pexels here.
- Unsplash- Again, this is another well known free stock photo site. They also have lots of pictures to choose from. You can check out Unsplash here.
Photo Editors
- Canva- Canva is a super popular photo editor where you can make images for Pinterest, Facebook, featured images for your blog posts, and much more. Canva is completely free but it also has a paid plan which comes with more features like premium fonts, graphics, and the ability to resize images. When you make a new account with Canva you’ll get to try they’re premium plan for FREE for 30 days. You can try out Canva and get their 30-day free trial here.
- PicMonkey- This is another very well known photo editor used amongst bloggers. PicMonkey does have some more advanced features that Canva doesn’t have. Unfortunately, though, you do have to pay a monthly fee to use PicMonkey. But they do offer a 7-day free trial so you can try it out! You can start a PicMonkey account and do their free trial here.
Other Blog Resources
- Creative Market- Creative Market is a website where you can buy fonts, themes, pictures, templates, and more! They also offer “Free Goods” every week that you can download for FREE! These can be anything from fonts to graphics. You can sign-up and get your free stuff from them here.
How Do Beginner Blogs Make Money?
So I’m sure one thing you may be wondering is, how do you make money with a mom blog?
There are a couple of different ways you can monetize your blog.
Here are a few common ways below:
- Ads
- Affiliate marketing
- Sponsored posts
- Sell your own products
Alright so now I’m sure your next question is…
How Much Do Mom Bloggers Make?
Now, of course, how much a blogger makes will vary.
Some may make $500 a month, others are making $5,000 a month!
It all depends on how long you’ve been doing it, how you’re doing it, and how much time you’re able to put into blogging.
In the beginning, though, expect to make nothing.
Then eventually you’ll start making pennies (which will be one of the coolest things in the world when you do lol).
But earning an income takes a long time.
Some have been able to do it in a matter of months. While others start earning money a couple of years later.
There’s really no real answer as everyone’s journey is so different. And not everyone is able to put 40 hours a week into there blog (especially when you have kids to watch).
Not saying this to discourage you or anything. Just trying to help you know what you’re expectations should be right now.
Wrapping it Up
And that’s how to start a mom blog!
This should give you a good start to your blogging journey.
Now, I should say that this post definitely does NOT have all the answers.
The purpose of this post is to help you easily start a self-hosted blog and give YOU the resources you’ll need for when you begin a blog.
This rest lies in your hands. What happens now is up to you.
I wish you the best of luck for you and your blog!
(Please keep in mind that I am not a professional of any kind. I am only a Mom who is going off of her own experience and research. You can read my full disclaimer policy here.)
Other Posts You May Like:
Legit Jobs for Stay at Home Moms
What made you want to start a mommy blog? Is this your first time making a blog? Tell me all about your blogging journey below in the comments! And if you liked this post, give it a share! Thanks!